Learning the basics
Let's get started with Seam! To help you learn this UI framework and some big important features, we're going to make a square frame that chases your mouse.
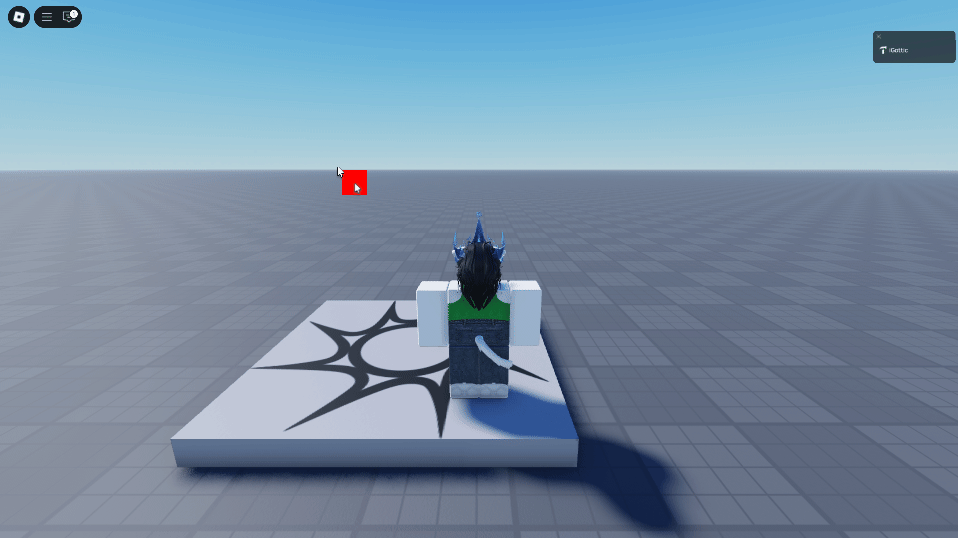
Once you finish, you should have something like this:
To begin, let's make a couple of assumptions:
- We're programming this in Studio, not an external editor
- Seam and the example code are both located in
ReplicatedFirst
Let's start by declaring our services and variables
local ReplicatedFirst = game:GetService("ReplicatedFirst")
local UserInputService = game:GetService("UserInputService")
local PlayersService = game:GetService("Players")

local Seam = require(ReplicatedFirst.Seam) -- For the sake of this tutorial, this is where Seam is

local Player = PlayersService.LocalPlayer
local PlayerGui = Player:WaitForChild("PlayerGui")
In this tutorial, you'll first learn how to use Rendered, Spring, and New. So, let's import them as well!
local ReplicatedFirst = game:GetService("ReplicatedFirst")
local UserInputService = game:GetService("UserInputService")
local PlayersService = game:GetService("Players")

local Seam = require(ReplicatedFirst.Seam)
local Rendered = Seam.Rendered -- We will use this
local Spring = Seam.Spring -- And this
local New = Seam.New -- And this

local Player = PlayersService.LocalPlayer
local PlayerGui = Player:WaitForChild("PlayerGui")
Now, before we get to making the chasing square, we need a ScreenGui instance under the player's PlayerGui that we can put it in. We can use Seam's New, which acts as if Instance.new() had a bunch of extra Seam spice.
You can make a new instance using the format New(ClassName, Properties). In this case, we want a GUI that:
- Does not reset when you die
- Ignores gui inset
- And of course, is parented to PlayerGui
So let's put this at the end of our script:
local Gui = New("ScreenGui", {
	ResetOnSpawn = false,
	IgnoreGuiInset = true,
	Parent = PlayerGui,
})
So far, it's the equivalent to doing this:
local Gui = Instance.new("ScreenGui")
Gui.ResetOnSpawn = false
Gui.IgnoreGuiInset = true
Gui.Parent = PlayerGui
Moving on though, let's get to the meat of this: the chasing square!
Let's start by (at the end of script) making our frame object:
local ChasingSquare = New("Frame", {
	Size = UDim2.fromOffset(50, 50),
	BackgroundColor3 = Color3.fromRGB(255, 0, 0),
	BorderSizePixel = 0,
	AnchorPoint = Vector2.new(0.5, 0.5),
	Parent = Gui,
})
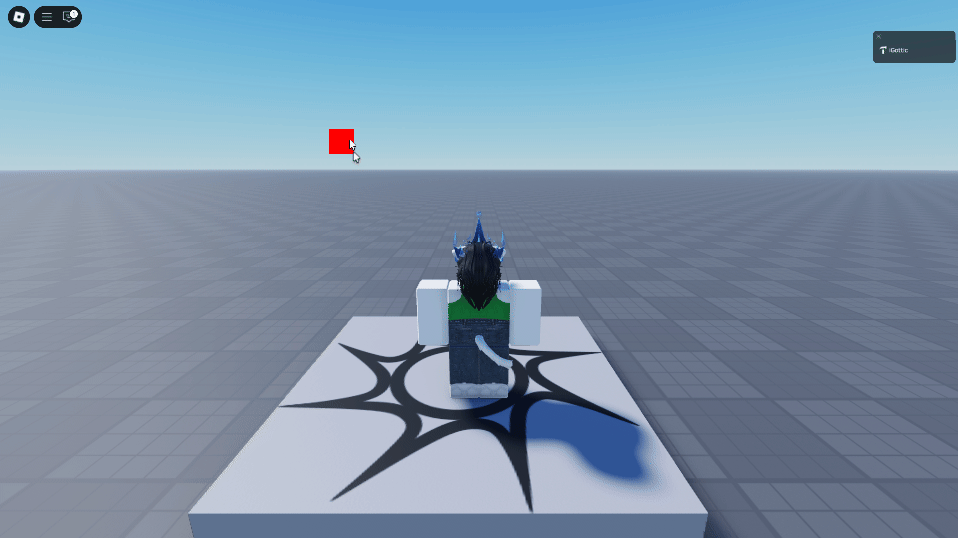
This frame is 50x50 square size, is red, has no border, anchored in the middle, and is parented to Gui.
If you press play right now, you should see it sitting in the top-left corner:
Let's start by making the square lock to where the mouse is. In this case, we'll be using Rendered, which returns any value every frame, and that value can be used elsewhere. This means that you can even use this state as a value to an instance property.
We can make a Rendered instance from Seam that, every frame, returns the mouse position as a UDim2, like so:
-- Let's make the rendered instance
local MousePositionRender = Rendered(function()
	local MouseLocation = UserInputService:GetMouseLocation() -- Get mouse position as Vector2
	local TargetPosition = UDim2.fromOffset(MouseLocation.X, MouseLocation.Y) -- Convert it to UI position

	return TargetPosition -- Return the UI position
end)

local ChasingSquare = New("Frame", {
	Size = UDim2.fromOffset(50, 50),
	BackgroundColor3 = Color3.fromRGB(255, 0, 0),
	BorderSizePixel = 0,
	AnchorPoint = Vector2.new(0.5, 0.5),
	Parent = Gui,

	Position = MousePositionRender -- Let's hook it up here
})
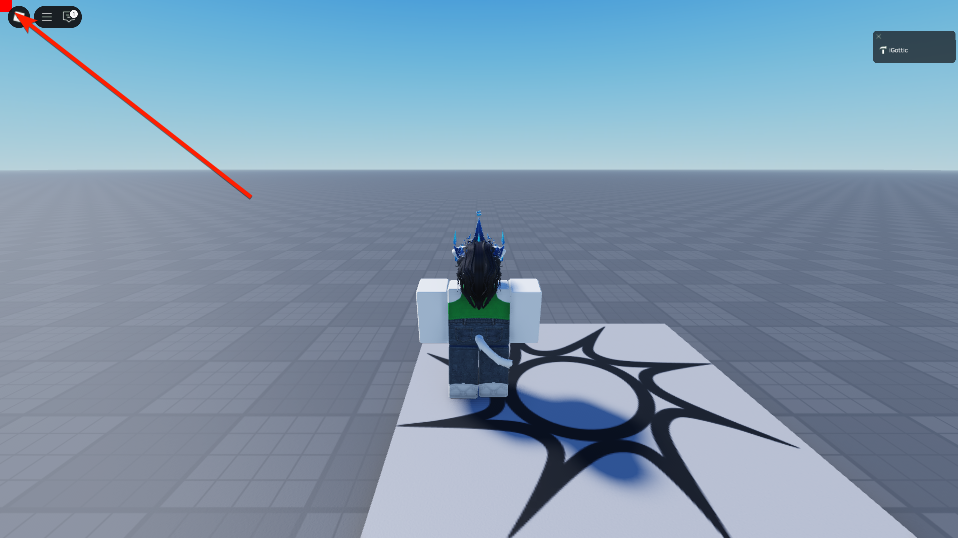
The MousePositionRender rendered instance is the state, and inside the New constructor, we set Position to it. The framework handles everything for you, so at this point, you should have a square that locks to your mouse like so:
Now, animating it is super easy; all we have to do is make a Spring object, which animates anything as if it were, well, a spring. Below the declaration for the MousePositionRender variable, let's make a new Spring that takes the render and animates it with a speed of 5 and dampening of 0.5 (these numbers just make it slower, don't worry about their meaning right now):
local MousePositionRender = Rendered(function()
	local MouseLocation = UserInputService:GetMouseLocation()
	local TargetPosition = UDim2.fromOffset(MouseLocation.X, MouseLocation.Y)

	return TargetPosition
end)

local MousePositionSpring = Spring(MousePositionRender, 5, 0.5) -- Making our spring
And then, we just make it so that the frame's position is set to the spring, and not the render. That's it!
local MousePositionSpring = Spring(MousePositionRender, 5, 0.5)

local ChasingSquare = New("Frame", {
	Size = UDim2.fromOffset(50, 50),
	BackgroundColor3 = Color3.fromRGB(255, 0, 0),
	BorderSizePixel = 0,
	AnchorPoint = Vector2.new(0.5, 0.5),
	Parent = Gui,

	Position = MousePositionSpring -- Changing it from the render to the spring
})
And now we have our final result!
local ReplicatedFirst = game:GetService("ReplicatedFirst")
local UserInputService = game:GetService("UserInputService")
local PlayersService = game:GetService("Players")

local Seam = require(ReplicatedFirst.Seam)
local Rendered = Seam.Rendered
local Spring = Seam.Spring
local New = Seam.New

local Player = PlayersService.LocalPlayer
local PlayerGui = Player:WaitForChild("PlayerGui")

local Gui = New("ScreenGui", {
	ResetOnSpawn = false,
	IgnoreGuiInset = true,
	Parent = PlayerGui,
})

local MousePositionRender = Rendered(function()
	local MouseLocation = UserInputService:GetMouseLocation()
	local TargetPosition = UDim2.fromOffset(MouseLocation.X, MouseLocation.Y)

	return TargetPosition
end)

local MousePositionSpring = Spring(MousePositionRender, 5, 0.5)

local ChasingSquare = New("Frame", {
	Size = UDim2.fromOffset(50, 50),
	BackgroundColor3 = Color3.fromRGB(255, 0, 0),
	BorderSizePixel = 0,
	AnchorPoint = Vector2.new(0.5, 0.5),
	Parent = Gui,

	Position = MousePositionSpring -- Changing it from the render to the spring
})
That being said, this is a lot of code for something so simple. So, let's simplify it.
First, we can put the Rendered declaration directly inside the spring, like so:
local MousePositionSpring = Spring(Rendered(function()
	local MouseLocation = UserInputService:GetMouseLocation()
	local TargetPosition = UDim2.fromOffset(MouseLocation.X, MouseLocation.Y)

	return TargetPosition
end), 5, 0.5)
But even further, we can set the position property of the frame directly with that. You can delete the variable and move that state directly to the New constructor:
local ChasingSquare = New("Frame", {
	Size = UDim2.fromOffset(50, 50),
	BackgroundColor3 = Color3.fromRGB(255, 0, 0),
	BorderSizePixel = 0,
	AnchorPoint = Vector2.new(0.5, 0.5),
	Parent = Gui,

	Position = Spring(Rendered(function()
		local MouseLocation = UserInputService:GetMouseLocation()
		local TargetPosition = UDim2.fromOffset(MouseLocation.X, MouseLocation.Y)

		return TargetPosition
	end), 5, 0.5)
})
Near the top of the script, where we delcared our Seam things, let's also import Children, which we will use next.
local Seam = require(ReplicatedFirst.Seam)
local Rendered = Seam.Rendered
local Spring = Seam.Spring
local New = Seam.New
-- We added the below:
local Children = Seam.Children
After cleaning up the code to remove unused variables, our script should now look like this:
local ReplicatedFirst = game:GetService("ReplicatedFirst")
local UserInputService = game:GetService("UserInputService")

local Seam = require(ReplicatedFirst.Seam) -- For the sake of this tutorial, this is where Seam is
local Rendered = Seam.Rendered
local Spring = Seam.Spring
local New = Seam.New

local Gui = New("ScreenGui", {
	ResetOnSpawn = false,
	IgnoreGuiInset = true,
	Parent = PlayerGui,
})

local ChasingSquare = New("Frame", {
	Size = UDim2.fromOffset(50, 50),
	BackgroundColor3 = Color3.fromRGB(255, 0, 0),
	BorderSizePixel = 0,
	AnchorPoint = Vector2.new(0.5, 0.5),
	Parent = Gui,

	Position = Spring(Rendered(function()
		local MouseLocation = UserInputService:GetMouseLocation()
		local TargetPosition = UDim2.fromOffset(MouseLocation.X, MouseLocation.Y)

		return TargetPosition
	end), 5, 0.5)
})
But there is more we can do!
We'll be using the Children declaration now. This actually is an index in the New constructor, meaning we use it as a property, not a value.
By doing this:
local Gui = New("ScreenGui", {
	ResetOnSpawn = false,
	IgnoreGuiInset = true,
	Parent = PlayerGui,

	[Children] = {} -- A table of instances
})
We are making everything in the table we created be a child of the GUI. Or, in other words, we set the Parent property of each of those instances to the GUI.
In this case, we only have a single instance to parent to the GUI: our chasing square frame. Let's do that with Children, and the final full script should look like this:
local ReplicatedFirst = game:GetService("ReplicatedFirst")
local UserInputService = game:GetService("UserInputService")

local Seam = require(ReplicatedFirst.Seam)
local Rendered = Seam.Rendered
local Spring = Seam.Spring
local New = Seam.New
local Children = Seam.Children

local Gui = New("ScreenGui", {
	ResetOnSpawn = false,
	IgnoreGuiInset = true,
	Parent = PlayerGui,

	[Children] = {
		New("Frame", {
			Size = UDim2.fromOffset(50, 50),
			BackgroundColor3 = Color3.fromRGB(255, 0, 0),
			BorderSizePixel = 0,
			AnchorPoint = Vector2.new(0.5, 0.5),

			Position = Spring(Rendered(function()
				local MouseLocation = UserInputService:GetMouseLocation()
				local TargetPosition = UDim2.fromOffset(MouseLocation.X, MouseLocation.Y)

				return TargetPosition
			end), 5, 0.5)
		})
	}
})
And that's it! It's a super simple script to do something fun. Now you know the basics!